C# Factory Method Design Pattern

Today I am going to write about a factory method design pattern and how to implement it in C#.

Factory method design pattern is one of the creational design pattern first presented by Gang of Four.

Creational patterns are developed to create the objects for the required classes.

Usage: When we do not know object of which class to be be instantiated then we can use factory method design pattern. Responsibility of the object creation is given to the subclasses.

Before starting to understand the implementation of factory method design pattern, let us try to create the problem which is addressed by factory method design pattern.

To demonstrate this problem, I am taking an example of metro(railway) ticketing requirements.

While traveling through metro trains, one needs to buy a ticket. Ticket can be categorized as SJT(Single Journey Ticket), RJT(Return Journey Ticket), Group Ticket, Period Pass, Trip Pass etc.

Once we choose the ticket to be issued from UI, we have to obtain it’s underlying object so that we can assign that ticket specific values and pass it further.

To achieve this I have created a common interface which shall be inherited by all the ticket types in our system.

public interface IProduct
{
    eProductType ProductType { get; set; }
    decimal Price { get; set; }
    int SourceStationId { get; set; }
    int DestinationStationId { get; set; }
    int Quantity { get; set; }
}

This interface is implemented by 3 classes which are Ticket, PeriodPass and TripPass

public class Ticket : IProduct
{
    public eProductType ProductType { get; set; }
    public decimal Price { get; set; }
    public int SourceStationId { get; set; }
    public int DestinationStationId { get; set; }

    public string TicketId { get; set; }
    public DateTime SaleTime { get; set; }
    public DateTime ValidityTime { get; set; }    
}

public class PeriodPass : IProduct
{
    public eProductType ProductType { get; set; }
    public decimal Price { get; set; }
    public int SourceStationId { get; set; }
    public int DestinationStationId { get; set; }

    public DateTime ValidFrom { get; set; }
    public DateTime ValidTill { get; set; }   
}

public class TripPass : IProduct
{
    public eProductType ProductType { get; set; }
    public decimal Price { get; set; }
    public int SourceStationId { get; set; }
    public int DestinationStationId { get; set; }

    public DateTime ValidFrom { get; set; }
    public DateTime ValidTill { get; set; }
    public int NoOfTrips { get; set; }
}

Now based on the product type(ticket type), we can create an instance of the corresponding class by writing a simple method which will accept enum value of eProductType and will return a type of IProduct.

public IProduct GetProduct(eProductType productType)
{
	switch(eProductType)
	{
		case eProductType.SJT:
			return new Ticket();
		case eProductType.RJT:
			return new Ticket();
		case eProductType.PeriodPass:
			return new PeriodPass();
		case eProductType.TripPass:
			return new TripPass();
	}
}

I have demonstrated the simple factory based on switch condition. But the above approach has some disadvantages. One needs to call the GetProduct() method and needs to pass the product type enum value. When new product gets introduced one needs to modify the switch case. This violates the Single Responsibility principle.

At this juncture, factory method pattern comes to rescue.

For each product which we need to create, we need to have a concrete product factory class. This class will be inherited from an abstract ProductFactory class.

public abstract class ProductFactory
{
    public abstract IProduct GetProduct(eProductType productType);
}

public class TicketFactory : ProductFactory
{
    public override IProduct GetProduct(eProductType productType)
    {
        return new Ticket(productType);
    }
}

public class PeriodPassFactory : ProductFactory
{
    public override IProduct GetProduct(eProductType productType)
    {
        return new PeriodPass(productType);
    }
}

So we have successfully utilized our existing IProduct interace and eProductType enum and created the abstract and concrete factory classes.

Now we need to introduce the creator class which will take the responsibility of identifying the correct product to be created and will return the relevant instance of the IProduct.

public class ProductCreator
{
	private readonly Dictionary<eProductType, ProductFactory> factories;

	private ProductCreator()
	{
		factories = new Dictionary<eProductType, ProductFactory>
		{
			{ eProductType.PeriodPass, new PeriodPassFactory() },
			{ eProductType.TripPass, new TripPassFactory() },			
			{ eProductType.SJT, new TicketFactory() },
			{ eProductType.RJT, new TicketFactory() }			
		};
	}

	public static ProductCreator InitializeProductCreator() => new ProductCreator();

	public IProduct CreateProduct(eProductType productType)
	{
		IProduct product = factories[productType].GetProduct(productType);
		return product;
	}
}

Here I have used dictionary to store the eProductType enum and their associated ProductFactory implementations. Using of dictionary is inspired from this blog post.

Now we are all set to utilize our factory implementation. We just need to have an instance of the ProductCreator class and an enum value of type eProductType.

By calling CreateProduct method on instance of the ProductCreator class will return us an instance of the class which implements the IProduct interface.

What have we achieved by this implementation?
When we want to introduce a new product we need not modify the existing concrete factories. We just need to implement the IProduct interface and need to introduce a new concrete factory class which will return an instance of the new product. Also we should not forget to add the eProductType association with new implementation of the ProductFactory class in the ProductCreator dictionary.

This way we have decoupled the logic of creating object from the creator and delegated this responsibility to the subclasses which are the concrete factory classes.

Filtering a collection in WPF using CollectionView

Today I will show you how to use CollectionView for filtering a collection.

As per microsoft docs, CollectionView is defined as

Represents a view for grouping, sorting, filtering, and navigating a data collection.

Among various usages mentioned above let us have a look at how filtering can be used.

Requirement:

We have a list of stations and we want to filter the list based on user input received through a textbox.

Solution:

I will use ListView to populate the list of the stations and will filter this list using the text entered in the search text box.

Here is the raw code which contains a text box and a list view.

       <StackPanel Width="300" HorizontalAlignment="Center">
            <TextBox x:Name="txtSearch" Text="{Binding SearchCriteria, UpdateSourceTrigger=PropertyChanged}" TabIndex="0">
                <i:Interaction.Triggers>
                    <i:EventTrigger EventName="TextChanged">
                        <i:InvokeCommandAction Command="{Binding SearchTextChangedCommand}"/>
                    </i:EventTrigger>
                    <i:EventTrigger EventName="LostFocus">
                        <i:InvokeCommandAction Command="{Binding SearchLostFocusCommand}"/>
                    </i:EventTrigger>
                </i:Interaction.Triggers>
            </TextBox>

            <ListView x:Name="listViewStation"
                ItemsSource="{Binding StationList}"
                      DisplayMemberPath="StationName"
                      SelectedValue="{Binding SelectedStation}" TabIndex="1">
                <i:Interaction.Triggers>
                    <i:EventTrigger EventName="LostFocus">
                        <i:InvokeCommandAction Command="{Binding ListViewLostFocusCommand}"/>
                    </i:EventTrigger>
                </i:Interaction.Triggers>
            </ListView>
        </StackPanel>

I have used Prism framework for auto wiring view model and to define the commands.

Here is the underlying view model’s code for the above mentioned view.

     public class MainWindowViewModel : BindableBase
    {
        private string searchCriteria;

        public string SearchCriteria
        {
            get { return searchCriteria; }
            set { SetProperty(ref searchCriteria, value); }
        }

        private Station selectedStaion;
        public Station SelectedStation
        {
            get { return selectedStaion; }
            set { SetProperty(ref selectedStaion, value); }
        }

        public DelegateCommand WindowLoadedCommand { get; set; }
        public DelegateCommand SearchTextChangedCommand { get; set; }
        public DelegateCommand ListViewLostFocusCommand { get; set; }
        public ObservableCollection<Station> StationList { get;  set;} = new ObservableCollection<Station>();

        public List<Station> stations = new List<Station>();

        public MainWindowViewModel()
        {
            WindowLoadedCommand = new DelegateCommand(WindowLoaded);
            SearchTextChangedCommand = new DelegateCommand(SearchTextChanged);
            ListViewLostFocusCommand = new DelegateCommand(ListViewLostFocus);
        }

        private void ListViewLostFocus()
        {
            //do something with the selected station
        }

        private void SearchTextChanged()
        {
            CollectionViewSource.GetDefaultView(StationList).Refresh();
        }

        private void LoadStationList()
        {
            stations = new List<Station>();
            stations.Add(new Station { StationName = "Mogra", StationId = 1 });
            stations.Add(new Station { StationName = "Dahisar", StationId = 2 });
            stations.Add(new Station { StationName = "Dahanukar Wadi", StationId = 3 });
            stations.Add(new Station { StationName = "Andheri", StationId = 4 });
            stations.Add(new Station { StationName = "National Park", StationId = 5 });
            stations.Add(new Station { StationName = "Gundavali", StationId = 6 });
            stations.Add(new Station { StationName = "Goregaon", StationId = 7 });
            StationList.AddRange(stations);
        }

        private void WindowLoaded()
        {
            LoadStationList();
            CollectionViewSource.GetDefaultView(StationList).Filter = FilterStations;
        }

        private bool FilterStations(object obj)
        {
            if (string.IsNullOrEmpty(SearchCriteria))
                return true;

            Station station = (Station)obj;

            var result = station.StationName.ToLower().StartsWith(SearchCriteria)
                || station.StationName.ToLower().Contains(SearchCriteria);

            return result;
        }
    }

CollectionViewSource class provides a static method GetDefaultView, which accepts the object as a source and returns an object of ICollectionView type. This is the default view which is attached to the given source collection.

ICollectionView has a Predicate named as Filter. This predicate is used to determine if the object passed to it can be included in the view.

I have used this predicate and provided my own implementation by attaching the FilterStations method in WindowLoaded event.

So until now we have set the filter criteria. Now we have to monitor the TextChanged event of text box and have to refresh the ICollectionView of the station collection.
This will trigger the FilterStations delegate and filter out the not required station.
Station names containing the text entered in text box is filtered and shown in the list view.

This filter operation do not change the underlying collection source. It just changes the view.
This is an awesome feature provided by WPF.

Code can be downloaded from Git

WPF MultiDataTrigger and IMultiValueConverter

It’s been a very long since I posted my last article. I am back now with new enthusiasm and with more energy.

So, today I am going to write about how to use MultiDataTrigger and IMultiValueConverter.
Recently I came across a situation where in I had to make a choice between these two.

I won’t say that both serve a same purpose. But there could be some situations where in one has to choose between these two choices.

Before proceeding let us try to understand the concept of MultiDataTrigger and IMultiValueConverter.
Definition of MultiDataTrigger given on docs says that,

“Represents a trigger that applies property values or performs actions when the bound data meet a set of conditions.”

While using MultiDataTrigger in XAML, we need to specify the conditions on which trigger would be activated. Once these conditions are met, a corresponding value in the setter tag would be set against the required property.

Let us have a look at hypothetical example. Application screen is having two check boxes and one text block.
Background color of the textblock needs to be set on click of these check boxes. Conditions for the same are:

  1. Background should be red when none of the check box is checked
  2. Background should be yellow when only first check box is checked
  3. Background should be blue when only second check box is checked
  4. Background should be green when both check boxes are checked

To achieve above condition we will use MultiDataTrigger in following mentioned way.

<StackPanel>
	<CheckBox Content="Weld" Name="cbWeld"/>
	<CheckBox Content="Assembly" Name="cbAssembly"/>               

	<TextBlock Text="Material">
		<TextBlock.Style>
			
<Style TargetType="{x:Type TextBlock}">
				<Style.Triggers>
					<MultiDataTrigger>
						<MultiDataTrigger.Conditions>
							<Condition Binding="{Binding ElementName=cbWeld, Path=IsChecked}" Value="True"/>
							<Condition Binding="{Binding ElementName=cbAssembly, Path=IsChecked}" Value="True"/>
						</MultiDataTrigger.Conditions>
						<Setter Property="Background" Value="Green"></Setter>
					</MultiDataTrigger>
					<MultiDataTrigger>
						<MultiDataTrigger.Conditions>
							<Condition Binding="{Binding ElementName=cbWeld, Path=IsChecked}" Value="False"/>
							<Condition Binding="{Binding ElementName=cbAssembly, Path=IsChecked}" Value="True"/>
						</MultiDataTrigger.Conditions>
						<Setter Property="Background" Value="Blue"></Setter>
					</MultiDataTrigger>
					<MultiDataTrigger>
						<MultiDataTrigger.Conditions>
							<Condition Binding="{Binding ElementName=cbWeld, Path=IsChecked}" Value="True"/>
							<Condition Binding="{Binding ElementName=cbAssembly, Path=IsChecked}" Value="False"/>
						</MultiDataTrigger.Conditions>
						<Setter Property="Background" Value="Yellow"></Setter>
					</MultiDataTrigger>
					<MultiDataTrigger>
						<MultiDataTrigger.Conditions>
							<Condition Binding="{Binding ElementName=cbWeld, Path=IsChecked}" Value="False"/>
							<Condition Binding="{Binding ElementName=cbAssembly, Path=IsChecked}" Value="False"/>
						</MultiDataTrigger.Conditions>
						<Setter Property="Background" Value="Red"></Setter>
					</MultiDataTrigger>
				</Style.Triggers>
			</Style>


		</TextBlock.Style>
	</TextBlock>
</StackPane>

Here I have used more than one MultiDataTrigger to achieve the objective. In every condition of MultiDataTrigger, different values of check boxes are monitored.
Background property of the textblock is set accordingly.
But the problem with this approach is that, MultiDataTrigger needs to be repeated in XAML to cater different requirements.

This problem can be solved using IMultiValueConverter. Documentation for IMultiValueConverter can be found here. IMultiValueConverter is used with Multibinding. In Multibinding, more that one binding can be specified and IMultiValueConverter can be used to convert the bound values to a single desired value.

Here we will bind IsChecked property and will implement IMultiValueConverter to convert the boolean values of check boxes to Brushes. This converted value would be assigned to Background property of the Textblock.

Let us implement IMultiValueConverter.

public class BooleanToColorConverter : IMultiValueConverter
{
	public object Convert(object[] values, Type targetType, object parameter, CultureInfo culture)
	{
		bool cb1 = (bool)values[0];
		bool cb2 = (bool)values[1];

		if (cb1 && cb2)
			return Brushes.Green;
		else if (cb1 && !cb2)
			return Brushes.Yellow;
		else if (!cb1 && cb2)
			return Brushes.Blue;
		else
			return Brushes.Red;
	}

	public object[] ConvertBack(object value, Type[] targetTypes, object parameter, CultureInfo culture)
	{
		return null;
	}
}

To use this BooleanToColorConverter, it’s namespace needs to be included in XAML and a resource needs to be defined for it.

<Window x:Class="WpfBasics.MainWindow"
        xmlns:custom="clr-namespace:WpfBasics">
<Window.Resources>        
	<custom:BooleanToColorConverter x:Key="ColorConverter"/>
</Window.Resources>
<StackPanel>
	<CheckBox Content="Weld" Name="cbWeld"/>
	<CheckBox Content="Assembly" Name="cbAssembly"/>               

	<TextBlock Text="Material">
		<TextBlock.Style>
			
<Style TargetType="{x:Type TextBlock}">
				<Setter Property="Background">
					<Setter.Value>
						<MultiBinding Converter="{StaticResource ColorConverter}">
							<Binding ElementName="cbWeld" Path="IsChecked"></Binding>
							<Binding ElementName="cbAssembly" Path="IsChecked"></Binding>
						</MultiBinding>
					</Setter.Value>
				</Setter>
			</Style>

		</TextBlock.Style>
	</TextBlock>
</StackPanel>
</Window>

Above code looks more elegant than the previous one. In Setter’s value, MultiBinding is set with the Converter.
BooleanToColorConverter accepts the values from various bindings and returns a desired color. This color is used as a value in setter for Background property of TextBlock.

So we have achieved the desired result using two different solutions.
Enjoy coding!!

How to implement a Singleton pattern in C#

Singleton design pattern is one of the creational design pattern, originally designed by Gang of Fours.
Sometimes we want to have only a single point access to the functionality of the class. Our code expects that every time an instance of the class gets created it should return only a single instance of the class. In such situations this pattern come in handy.

There are many ways to create a class which returns a single instance. I am going to show one of it.

Implementation

I will create a private constructor of the class and will create a static property to get the access of the single instance of our class. Singleton object gets created lazily. i.e. an instance of the class gets created when a request to get the instance has been initialized first time.

I am going to show example from my one of the post which I wrote. In this post I had shown you how to host a WCF service in a window service.

In that post, WCF service is exposed to outside world, which can be accessed by many clients and messages received from all the requests are to be dispatched to SelfHostService class. So this makes a perfect scenario to expose our SelfHostService class as a singleton.

Lets have a look at a code which makes our class as singleton.

public class SelfHostService : ServiceBase
{
    private static SelfHostService instance = null;
    private static readonly object padlock = new object();
 
    //a private constructor
    SelfHostService()
    {       
    }
 
    //public static property to access the instance of the SelfHostService class
    public static SelfHostService Instance
    {
        get
        {
            lock (padlock)
            {
                if (instance == null)
                    instance = new SelfHostService();
 
                return instance;
            }
        }
    }
}

In above code a static property named Instance of type SelfHostService is created. This Instance property makes sure that only one instance is returned.

I have used lock statement to ensure that our code remains thread safe.i.e it assures that only one instance will get created of SelfHostService class.

This is one of the many ways to implement a singleton pattern in C#. To conclude, I can say that it would be more appropriate to make a singleton class as a Sealed class.

Enjoy Coding!!!!!

Do not forget to share this post if you like it.

Create window service using Topshelf

There are various ways to create a windows service. We can create a window service project from a standard visual studio template, or we can create a console application and can extend a ServiceBase class which will convert our application to windows service.

In all these above methods we have to write a lot of manual code to configure our application so that it will function properly, besides our business logic.

Wouldn’t it be nice to get rid of all these config related stuff and to just focus on actual service functionality, without knowing how ServiceBase works.

Yes, that is absolutely possible. There is an open source Windows Service Framework TopShelf developed for .net platform.

TopShelf makes task of creating a window service very easy. More documentation about topshelf can be found at documentation.

Lets us try our hand at coding a window service using TopShelf. We will also deploy it with a single command from command prompt.

Create a console application named as WinServTopShelf.

We will have to add a reference of Topshelf.dll in our console application. There are multiple ways to add the reference. You can use NuGet Package Manager or binaries can be directly downloaded from GitHub.

I am going with a second method. Download a zip file and unzip it. Include a reference of Topshelf.dll in WinServTopShelf console application project.

Now, add a new class named as WinTopShelf in this application. We will add two methods in this class which are Start() and Stop() as shown below

public void Start()
{
}

public void Stop()
{
}

Now Lets start writing our service logic.

public class WinTopShelf
{
	Timer timer;

	public WinTopShelf()
	{
		timer = new Timer();            
	}

	public void Start()
	{
	}

	public void Stop()
	{
	}
}

In above code I have initialized a timer class member in constructor.

I am going to create a timer based service, to which a dedicated task will be assigned. This task will be executed after elapsed time ticks which we will of course configure in the code.

Now let us write a task which would be assigned to ElapsedEventHandler event of timer.
Our task will create a file at C:\TopShelf\task.txt location and will append the text in this file.

public class WinTopShelf
{
	Timer timer;

	public WinTopShelf()
	{
		timer = new Timer();            
	}

	private void DoWork(object sender, ElapsedEventArgs e)
	{
		using (var writer = new StreamWriter(@"C:\TopShelf\task.txt", true))
		{
			writer.WriteLine(DateTime.Now + " Topshelf has made windows service development very easy");
		}
	}

	public void Start()
	{
		timer.Interval = 60000;
		timer.Elapsed += new ElapsedEventHandler(DoWork);
		timer.Start();
	}

	public void Stop()
	{
		timer.Stop();
	}        
}

Above code is self explanatory. Now I will show you how to integrate Topshelf’s capabilities to convert our this simple console application to a window service.

While creating a project, a default class Program is added, in which Main method resides.
This Main method is the entry point of the application.

To start with TopShelf, we have to use Topshelf namespace.

TopShelf provides HostFactory class to facilitate different tasks. In Main() method we just have to write a logic using HostFactory.Run() method, in which we will write a very simple and readable code which is analogous to the implementation of ServiceBase class.

static void Main(string[] args)
{
	HostFactory.Run(r =>
	{
		r.Service<WinTopShelf>
		  (service =>
		  {
			  service.ConstructUsing(instance => new WinTopShelf());
			  service.WhenStarted(instance => instance.Start());
			  service.WhenStopped(instance => instance.Stop());
		  });
	});
}

In above code, r.Service specifies that WinTopShelf should be used as the service class.

service.ConstructUsing(instance => new WinTopShelf()) statement specifies which constructor to be used to create an instance of WinTopShelf class.

service.WhenStarted(instance => instance.Start()) statement specifies method to be executed when service starts.

service.WhenStopped(instance => instance.Stop()) statement specifies method to be executed when service stops.

I will add some more essential code as shown below:

static void Main(string[] args)
{
	HostFactory.Run(r =>
	{
		r.Service<WinTopShelf>
		  (service =>
				  {
					  service.ConstructUsing(instance => new WinTopShelf());
					  service.WhenStarted(instance => instance.Start());
					  service.WhenStopped(instance => instance.Stop());
				  });
				  
		r.RunAsLocalService();

		r.SetDisplayName("Topshelf facilitated service");

		r.SetDescription("This service has been created using a TopShelf open source framework for creating a windows serviecs.");
	}
            );
}							  

r.RunAsLocalService() specifies that how to run the service when it gets installed. I chose to run the service as a local service. Other alternatives are RunAsLocalSystem(), RunAsNetworkService() and RunAsPrompt().

SetDisplayName and SetDescription are used to set the display name and description of the service which can be seen in the service control manager console.

So our service is now ready to compile and install. Compile our project WinServTopShelf.

Let us install this service. Run a command prompt as an administrator and navigate to the directory where you have to place the WinServTopShelf.exe and other compiled assemblies.

Execute WinServTopShelf.exe install command. Done!!!!!! Our service has been installed.

installation

Now to start the service you need to open the service control manager and search for service name which we have configured as Topshelf facilitated service.

scm

You can start the service and it will run smoothly. To see the output open a file C:\TopShelf\task.txt on your machine and see the result.

To summarize this we can say that it is very easy and quick way to create a window service using TopShelf and you should have a knowledge of lambda expression and syntax to use it.

A complete code sample can be downloaded from GitHub. This code sample is created using Visual Studio 2015.

Enjoy Coding!!!!

Do not forget to share this post if you liked the content.

Buy books from Amazon

Dispatcher object in WPF for multi-threading

Today I am going to show you how to use dispatcher object in WPF application. But before starting lets have some insights on dispatcher objects. DispatcherObject is meant for any object that wants to be accessed only in the thread that created it. Many WPF classes are derived from DispatcherObject class.

When a WPF application starts, two threads are spawned by the WPF application. One background thread for managing the UI and another for rendering the various controls on UI. As a developer many of the times we do not deal directly with the rendering thread. We just put required controls in the UI and implement their code behind.

UI thread picks each control to be rendered and places it in the Dispatcher. Dispatcher queue processes each control on priority basis.

I think that is enough to have the basic idea WPF threads. Now lets move back to usage of DispatcherObject.

Since Dispatcher also processes each control one by one, our application can’t leverage the power of multi threading to make the application responsive.

While developing WPF application, we often encounter a situation where in a button click or some other events take longer time to process. This can be due to fetching heavy data or might be some other time consuming task.

If we write code for this long running task in an event, WPF application has to wait till that task gets finished and ultimately freezes our app.

At this time a DispatcherObject can come to our rescue and can make our application responsive.

To demonstrate this concept I have created a WPF application in visual studio 2015.

I have added two buttons and two text boxes in this WPF application. XAML code for the same looks as below

<Window x:Class="DiapatcherDemo.MainWindow"
        xmlns="http://schemas.microsoft.com/winfx/2006/xaml/presentation"
        xmlns:x="http://schemas.microsoft.com/winfx/2006/xaml"
        xmlns:d="http://schemas.microsoft.com/expression/blend/2008"
        xmlns:mc="http://schemas.openxmlformats.org/markup-compatibility/2006"
        xmlns:local="clr-namespace:DiapatcherDemo"
        mc:Ignorable="d"
        Title="MainWindow" Height="350" Width="525">
    <Grid>
        <StackPanel>
            <Button Name="btnLong" Click="btnLong_Click" Background="DarkSeaGreen" Width="200" HorizontalAlignment="Center">Start a long running task</Button>
            <TextBox Name="txtInfo" Background="Salmon">Task not started yet</TextBox>
            <Button Name="btnCurrent" Click="btnCurrent_Click" Background="CadetBlue" Width="200" HorizontalAlignment="Center">Do other tasks</Button>
            <TextBox Name="txtCurrent" Background="Moccasin">Result of other tasks</TextBox>
        </StackPanel>
    </Grid>
</Window>

We will use first button to start a long running task. Meanwhile we can use functionality of second button while long running task initiated by first button is still running.

Code behind for this application is

private delegate void CalculateTimeElapsed();
DateTime currentDateTime;
static int count = 0;

private void btnLong_Click(object sender, RoutedEventArgs e)
{
    btnLong.IsEnabled = false;
    currentDateTime = DateTime.Now;
    
    Thread longRunningThread = new Thread(new ThreadStart(delegate ()  { Thread.Sleep(10000); Application.Current.Dispatcher.BeginInvoke(System.Windows.Threading.DispatcherPriority.Normal, new CalculateTimeElapsed(PostLongRunningTasks)); }));
    longRunningThread.Start();
}

In above event, a thread has been initiated. In this thread a long running task is performed which is Thread.Sleep(10000) in our case. After this we have instructed thread delegate to invoke a method
PostLongRunningTasks on applications Dispatcher object, because a button has been created from Application’s thread. In this method we can alter/change/assign any existing WPF controls present in current application.

Lets have a look into this method’s implementation

private void PostLongRunningTasks()
{
    txtInfo.Text = "Total time elapsed required to finish the task is : " + (DateTime.Now - currentDateTime);
    btnLong.IsEnabled = true;
}

Since above method is attached to BeginInvoke, it runs asynchronously on the application thread(as we have attached it to application’s Dispatcher object).

Below is the implementation of the second button, which remains responsive while long running task initiated by first button is going on.

private void btnCurrent_Click(object sender, RoutedEventArgs e)
{
    txtCurrent.Text = "Above button is clicked " + ++count + " times";
}

This is how we can implement multi threading in WPF. There are many other ways to implement multi threading and this is one of them.

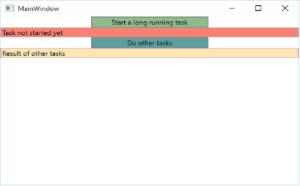
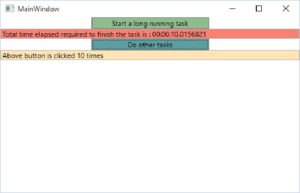
Here are the screen shots of the application.

before running a task

before running a task

after runing task

after running task

Complete code sample can be downloaded from Git

Configuration based activation of WCF service – without SVC files

Prior to .net 4.0, while creating and hosting a WCF service it was mandatory to provide a .svc file. This .svc file is a text file which contains name of the service and other required information for ServiceHost class.

Microsoft introduced a config based activation from .net 4.0. i.e you can configure it from web.config file or application files if hosted in other applications. This feature lets you register your service under a relative virtual path. You have to also specify the name of the class which would be served as a service using the relative virtual path.

Advantage of config based activation is that you don’t have to maintain .svc files separately. Configuration to be done is minimal. This does not make much difference for small projects but it surely makes a significant impact on large and scalable projects wherein you have to deal with hundreds of services.

Lets us create a project to demonstrate this concept.

Create a WCF Service Application project. Name it as ConfigBasedService.

Delete Service1.svc and IService1.cs files from project.

Add a new Interface IMessageListenerService.cs as follows

namespace ConfigBasedService
{
    public interface IMessageListenerService
    {
        bool ReceiveMessage(string message);
    }
}

Add a new class MessageListenerService.cs and implement IMessageListenerService. Also decorate MessageListenerService class with ServiceContract attribute and methods with OperationContract attribute

namespace ConfigBasedService
{
    [ServiceContract]
    public class MessageListenerService : IMessageListenerService
    {
        [OperationContract]
        public bool ReceiveMessage(string message)
        {
            if (string.IsNullOrEmpty(message))
                return false;

            return true;
        }
    }
}

Since we are going to activate our service using configuration to get rid of the .svc files, we have to add activation related information in configuration file.
We will add serviceHostingEnvironment element in system.serviceModel.

Now comes the interesting part. configuration for all the services which are to be hosted are to be added in serviceActivations element. For our MessageListenerService we will have to add a configuration as shown below.

<serviceHostingEnvironment aspNetCompatibilityEnabled="true" multipleSiteBindingsEnabled="true">
    <serviceActivations>
       <add relativeAddress="MessageListenerService.svc" service="ConfigBasedService.MessageListenerService"/>
    </serviceActivations>
</serviceHostingEnvironment>

In above code relative address specified is relative to the root application. Service attribute value denotes the class of the service.

Our service is ready. You can host the service on IIS and test it. You can also debug the service and concatenate the URL in browser with relative address to see the running service. This service can be tested using wcftestclient by adding the concatenated path.

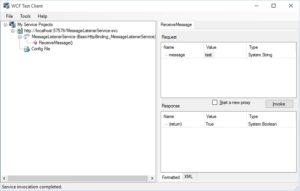
Below is the result of successful invocation of MessageListenerService from WcfTestClient

WcfTestClient

WcfTestClient


Entire code sample can be downloaded from Git

Enjoy Coding!!!!!!

How to install a window service

In my last post I had shown you how to create a self hosted windows service.
In this post I am going to walk through the process of adding an installer in a window service and how to use it for installation of window service.

  1. Right click on SelfHostService project and add an installer class named as WindowServiceInstaller.cs
  2. A class with following code snippet will be generated by default
  3. namespace SelfHostService
    {
        [RunInstaller(true)]
        public partial class WindowServiceInstaller : System.Configuration.Install.Installer
        {
            public WindowServiceInstaller()
            {
                InitializeComponent();
            }
        }
    }
    
  4. To install this SelfHostService executable, which contains a class that extend ServiceBase, we will require a ServiceProcessInstaller
  5. MSDN description of the ServiceProcessInstaller class is
  6. Installs an executable containing classes that extend ServiceBase. This class is called by installation utilities, such as InstallUtil.exe, when installing a service application.

  7. Also we will require ServiceInstaller class. MSDN description of the ServiceInstaller class is
  8. Installs a class that extends ServiceBase to implement a service. This class is called by the install utility when installing a service application.

  9. Let us finish our tiny installer. A complete code would look like this
  10. namespace SelfHostService
    {
        [RunInstaller(true)]
        public partial class WindowServiceInstaller : System.Configuration.Install.Installer
        {
            private ServiceProcessInstaller process;
            private ServiceInstaller service;
    
            public WindowServiceInstaller()
            {
                process = new ServiceProcessInstaller();
                process.Account = ServiceAccount.LocalService;
                service = new ServiceInstaller();
                service.ServiceName = "Self Hosted Windows Service";
                service.Description = "This is a self hosted windows service and can accept messages on port 8082 through HTTP";
                Installers.Add(process);
                Installers.Add(service);
            }
        }
    }
    
  11. [RunInstaller(true)] attributes is used by installutil.exe to identify the correct installer
  12. Compile the project. From command prompt, navigate to the path on your machine where InstallUtil.exe is located.
  13. Run command >installutil SelfHostService.exe
  14. Above command will install a window service. Now open Service Control Manager and start the service.

Thats all for this post. In next post I will show you how to create a MSI Installer file using a set up project.

How to self host a WCF service in a windows service

Today I am going to show you how to host a WCF service in a managed environment such as windows service. Let us see how to achieve this through C#.
Here, I will first show you how to create a simple windows service and then how to host a WCF service in it.
I will also show you how to pass the external messages received on this service, to a host. I am going to use a singleton pattern to avoid the race condition while receiving messages concurrently.

  1. Create a “Console Application” project named as “SelfHostService” using installed templates in Visual Studio
  2. Delete Program.cs file from project
  3. Add a new class named as SelfHostService.cs
  4. Click Add Reference menu to open a Add Reference Dialog Box
  5. Select System.ServiceProcess namespace to refer
  6. ServiceBase class resides in this newly added namespace, which is required to create a service application. Derive SerivceBase class in SelfHostService class
  7. Also add a reference to System.ServiceModel namespace
  8. Now let us put some code in SelfHostService class
  9.     public class SelfHostService : ServiceBase
        {
            public ServiceHost serviceHost = null;
            private bool startProcessing;        
            private static SelfHostService instance = null;
            private static readonly object padlock = new object();
    
            //a private constructor
            SelfHostService()
            {
                ServiceName = "Self Hosted Service";
            }
    
            //public static property to access the instance of the SelfHostService class
            public static SelfHostService Instance
            {
                get
                {
                    lock (padlock)
                    {
                        if (instance == null)
                            instance = new SelfHostService();
    
                        return instance;
                    }
                }
            }
        }
    
  10. In above code I have created a public property named Instance to provide a single instance of SelfHostService class
  11. Now let us define a service contract IMessageListener
  12. namespace SelfHostService
    {
        public interface IMessageListener
        {
            bool AcceptMessages(string messsage);
        }
    }
    
  13. We will have to override OnStart() and OnStop() methods of ServiceBase class. These methods contains instructions to follow when service starts and stops respectively. Let us write a code for these methods
  14.         protected override void OnStart(string[] args)
            {
                 if (serviceHost != null)
                        serviceHost.Close();
    
                    serviceHost = new ServiceHost(typeof(MessageListenerService));
    
                    serviceHost.Open();
    
                    var timer = new Timer();
                    timer.Interval = 60000;
                    timer.Elapsed += new ElapsedEventHandler(DoWork);
                    timer.Start();
            }
    
            protected override void OnStop()
            {
                if (serviceHost != null)
                {
                    serviceHost.Close();
                    serviceHost = null;
                }
            }
    
  15. DoWork method is a task assigned to a timer which has been initialized in OnStart() method. After every interval elapses, this method will get executed. So one can write any code which is to be performed repetitively by a window service.
  16.         private void DoWork(object sender, ElapsedEventArgs e)
            {
                //Add code to do the intended work
            }
    
  17. I will add a method to accept requests, received by MessageListenerService
  18.         public bool AcceptExternalMessages(string message)
            {
                if (string.IsNullOrEmpty(message))
                    return false;
                else
                    return true;
            }
    
  19. Now we will implement IMessageListener in MessageListenerService
  20.     public class MessageListenerService : IMessageListener
        {
            public bool AcceptMessages(string message)
            {
                //Notify message to windows service
                return SelfHostService.Instance.AcceptExternalMessages(message);
            }
        }
    
  21. We will have to configure the services’ base address, binding and contracts
  22. <?xml version="1.0" encoding="utf-8" ?>
    <configuration>
      <system.serviceModel>    
    	<services>
          <service name="SelfHostService.MessageListenerService" behaviorConfiguration="ServiceBehavior">
            <host>
              <baseAddresses>
                <add baseAddress="http://localhost:8082/SelfHostService/Service"/>
              </baseAddresses>
            </host>
            
            <endpoint address="" binding="wsHttpBinding" contract="SelfHostService.IMessageListener" />
            
            <endpoint address="mex" binding="mexHttpBinding" contract="IMetadataExchange" />
          </service>
        </services>
        <behaviors>
          <serviceBehaviors>
            <behavior name="ServiceBehavior" >
              <serviceMetadata httpGetEnabled="true"/>
              <serviceDebug includeExceptionDetailInFaults="false"/>
            </behavior>
          </serviceBehaviors>
        </behaviors>
      </system.serviceModel>
    </configuration>
    

In my next post I will write about how to install this service using InstallUtil.exe

Note: This code post is written in C# 6.0 in Visual Studio 2015

Extension methods in C#

Extension methods are special methods in C#, which allows to extend the functionality of an existing class. These methods are mostly used to add an additional behavior to classes which are closed to modification.

While programming we come across a situation where some third party library does not provide a certain behavior in their classes and we want to have the same. In such situation extension methods come to rescue.

Syntax for extension method is very simple. Extension methods are always static. First parameter in this method should be of type which you are going to extend, preceded by this keyword . (This is mandatory to make a method as extension method, though you do not have to pass it.) Other parameters can be defined after this as required.

public static ExtensionMethod(this TypeToExtend parameter)
{

//put desired stuff to be done with parameter

}

Lets have a look to real time example.

public static class ExtensionMethods
{

  public static int GetNumberCount(this String myString)
  {
    int count = 0;
    
    foreach(char character in myString)
    { 
       if(Char.IsDigit(character))
         count++;
    }

    return count;
 } 

} 

Above extension method can be invoked in the same way as instance method:

string numberedString = "Company strength is 2948";
int numberCount = numberedString.GetNumberCount();

More facts about extension methods:

  • Extension methods are always written in a static class.
  • Extension methods are always static.
  • If class which is being extended contains a method with same signature as that of the extension method, then extension method never gets called.
  • Though extension methods are static they are invoked as an instance method.
  • Multi parameter extension method can be written.