Code

Create window service using Topshelf

There are various ways to create a windows service. We can create a window service project from a standard visual studio template, or we can create a console application and can extend a ServiceBase class which will convert our application to windows service.

In all these above methods we have to write a lot of manual code to configure our application so that it will function properly, besides our business logic.

Wouldn’t it be nice to get rid of all these config related stuff and to just focus on actual service functionality, without knowing how ServiceBase works.

Yes, that is absolutely possible. There is an open source Windows Service Framework TopShelf developed for .net platform.

TopShelf makes task of creating a window service very easy. More documentation about topshelf can be found at documentation.

Lets us try our hand at coding a window service using TopShelf. We will also deploy it with a single command from command prompt.

Create a console application named as WinServTopShelf.

We will have to add a reference of Topshelf.dll in our console application. There are multiple ways to add the reference. You can use NuGet Package Manager or binaries can be directly downloaded from GitHub.

I am going with a second method. Download a zip file and unzip it. Include a reference of Topshelf.dll in WinServTopShelf console application project.

Now, add a new class named as WinTopShelf in this application. We will add two methods in this class which are Start() and Stop() as shown below

public void Start()
{
}

public void Stop()
{
}

Now Lets start writing our service logic.

public class WinTopShelf
{
	Timer timer;

	public WinTopShelf()
	{
		timer = new Timer();            
	}

	public void Start()
	{
	}

	public void Stop()
	{
	}
}

In above code I have initialized a timer class member in constructor.

I am going to create a timer based service, to which a dedicated task will be assigned. This task will be executed after elapsed time ticks which we will of course configure in the code.

Now let us write a task which would be assigned to ElapsedEventHandler event of timer.
Our task will create a file at C:\TopShelf\task.txt location and will append the text in this file.

public class WinTopShelf
{
	Timer timer;

	public WinTopShelf()
	{
		timer = new Timer();            
	}

	private void DoWork(object sender, ElapsedEventArgs e)
	{
		using (var writer = new StreamWriter(@"C:\TopShelf\task.txt", true))
		{
			writer.WriteLine(DateTime.Now + " Topshelf has made windows service development very easy");
		}
	}

	public void Start()
	{
		timer.Interval = 60000;
		timer.Elapsed += new ElapsedEventHandler(DoWork);
		timer.Start();
	}

	public void Stop()
	{
		timer.Stop();
	}        
}

Above code is self explanatory. Now I will show you how to integrate Topshelf’s capabilities to convert our this simple console application to a window service.

While creating a project, a default class Program is added, in which Main method resides.
This Main method is the entry point of the application.

To start with TopShelf, we have to use Topshelf namespace.

TopShelf provides HostFactory class to facilitate different tasks. In Main() method we just have to write a logic using HostFactory.Run() method, in which we will write a very simple and readable code which is analogous to the implementation of ServiceBase class.

static void Main(string[] args)
{
	HostFactory.Run(r =>
	{
		r.Service<WinTopShelf>
		  (service =>
		  {
			  service.ConstructUsing(instance => new WinTopShelf());
			  service.WhenStarted(instance => instance.Start());
			  service.WhenStopped(instance => instance.Stop());
		  });
	});
}

In above code, r.Service specifies that WinTopShelf should be used as the service class.

service.ConstructUsing(instance => new WinTopShelf()) statement specifies which constructor to be used to create an instance of WinTopShelf class.

service.WhenStarted(instance => instance.Start()) statement specifies method to be executed when service starts.

service.WhenStopped(instance => instance.Stop()) statement specifies method to be executed when service stops.

I will add some more essential code as shown below:

static void Main(string[] args)
{
	HostFactory.Run(r =>
	{
		r.Service<WinTopShelf>
		  (service =>
				  {
					  service.ConstructUsing(instance => new WinTopShelf());
					  service.WhenStarted(instance => instance.Start());
					  service.WhenStopped(instance => instance.Stop());
				  });
				  
		r.RunAsLocalService();

		r.SetDisplayName("Topshelf facilitated service");

		r.SetDescription("This service has been created using a TopShelf open source framework for creating a windows serviecs.");
	}
            );
}							  

r.RunAsLocalService() specifies that how to run the service when it gets installed. I chose to run the service as a local service. Other alternatives are RunAsLocalSystem(), RunAsNetworkService() and RunAsPrompt().

SetDisplayName and SetDescription are used to set the display name and description of the service which can be seen in the service control manager console.

So our service is now ready to compile and install. Compile our project WinServTopShelf.

Let us install this service. Run a command prompt as an administrator and navigate to the directory where you have to place the WinServTopShelf.exe and other compiled assemblies.

Execute WinServTopShelf.exe install command. Done!!!!!! Our service has been installed.

installation

Now to start the service you need to open the service control manager and search for service name which we have configured as Topshelf facilitated service.

scm

You can start the service and it will run smoothly. To see the output open a file C:\TopShelf\task.txt on your machine and see the result.

To summarize this we can say that it is very easy and quick way to create a window service using TopShelf and you should have a knowledge of lambda expression and syntax to use it.

A complete code sample can be downloaded from GitHub. This code sample is created using Visual Studio 2015.

Enjoy Coding!!!!

Do not forget to share this post if you liked the content.

Buy books from Amazon
Configuration based activation of WCF service – without SVC files

Prior to .net 4.0, while creating and hosting a WCF service it was mandatory to provide a .svc file. This .svc file is a text file which contains name of the service and other required information for ServiceHost class.

Microsoft introduced a config based activation from .net 4.0. i.e you can configure it from web.config file or application files if hosted in other applications. This feature lets you register your service under a relative virtual path. You have to also specify the name of the class which would be served as a service using the relative virtual path.

Advantage of config based activation is that you don’t have to maintain .svc files separately. Configuration to be done is minimal. This does not make much difference for small projects but it surely makes a significant impact on large and scalable projects wherein you have to deal with hundreds of services.

Lets us create a project to demonstrate this concept.

Create a WCF Service Application project. Name it as ConfigBasedService.

Delete Service1.svc and IService1.cs files from project.

Add a new Interface IMessageListenerService.cs as follows

namespace ConfigBasedService
{
    public interface IMessageListenerService
    {
        bool ReceiveMessage(string message);
    }
}

Add a new class MessageListenerService.cs and implement IMessageListenerService. Also decorate MessageListenerService class with ServiceContract attribute and methods with OperationContract attribute

namespace ConfigBasedService
{
    [ServiceContract]
    public class MessageListenerService : IMessageListenerService
    {
        [OperationContract]
        public bool ReceiveMessage(string message)
        {
            if (string.IsNullOrEmpty(message))
                return false;

            return true;
        }
    }
}

Since we are going to activate our service using configuration to get rid of the .svc files, we have to add activation related information in configuration file.
We will add serviceHostingEnvironment element in system.serviceModel.

Now comes the interesting part. configuration for all the services which are to be hosted are to be added in serviceActivations element. For our MessageListenerService we will have to add a configuration as shown below.

<serviceHostingEnvironment aspNetCompatibilityEnabled="true" multipleSiteBindingsEnabled="true">
    <serviceActivations>
       <add relativeAddress="MessageListenerService.svc" service="ConfigBasedService.MessageListenerService"/>
    </serviceActivations>
</serviceHostingEnvironment>

In above code relative address specified is relative to the root application. Service attribute value denotes the class of the service.

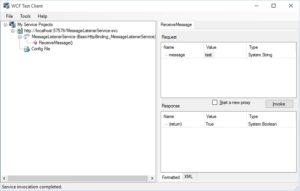
Our service is ready. You can host the service on IIS and test it. You can also debug the service and concatenate the URL in browser with relative address to see the running service. This service can be tested using wcftestclient by adding the concatenated path.

Below is the result of successful invocation of MessageListenerService from WcfTestClient

WcfTestClient

WcfTestClient


Entire code sample can be downloaded from Git

Enjoy Coding!!!!!!

How to install a window service

In my last post I had shown you how to create a self hosted windows service.
In this post I am going to walk through the process of adding an installer in a window service and how to use it for installation of window service.

  1. Right click on SelfHostService project and add an installer class named as WindowServiceInstaller.cs
  2. A class with following code snippet will be generated by default
  3. namespace SelfHostService
    {
        [RunInstaller(true)]
        public partial class WindowServiceInstaller : System.Configuration.Install.Installer
        {
            public WindowServiceInstaller()
            {
                InitializeComponent();
            }
        }
    }
    
  4. To install this SelfHostService executable, which contains a class that extend ServiceBase, we will require a ServiceProcessInstaller
  5. MSDN description of the ServiceProcessInstaller class is
  6. Installs an executable containing classes that extend ServiceBase. This class is called by installation utilities, such as InstallUtil.exe, when installing a service application.

  7. Also we will require ServiceInstaller class. MSDN description of the ServiceInstaller class is
  8. Installs a class that extends ServiceBase to implement a service. This class is called by the install utility when installing a service application.

  9. Let us finish our tiny installer. A complete code would look like this
  10. namespace SelfHostService
    {
        [RunInstaller(true)]
        public partial class WindowServiceInstaller : System.Configuration.Install.Installer
        {
            private ServiceProcessInstaller process;
            private ServiceInstaller service;
    
            public WindowServiceInstaller()
            {
                process = new ServiceProcessInstaller();
                process.Account = ServiceAccount.LocalService;
                service = new ServiceInstaller();
                service.ServiceName = "Self Hosted Windows Service";
                service.Description = "This is a self hosted windows service and can accept messages on port 8082 through HTTP";
                Installers.Add(process);
                Installers.Add(service);
            }
        }
    }
    
  11. [RunInstaller(true)] attributes is used by installutil.exe to identify the correct installer
  12. Compile the project. From command prompt, navigate to the path on your machine where InstallUtil.exe is located.
  13. Run command >installutil SelfHostService.exe
  14. Above command will install a window service. Now open Service Control Manager and start the service.

Thats all for this post. In next post I will show you how to create a MSI Installer file using a set up project.

How to self host a WCF service in a windows service

Today I am going to show you how to host a WCF service in a managed environment such as windows service. Let us see how to achieve this through C#.
Here, I will first show you how to create a simple windows service and then how to host a WCF service in it.
I will also show you how to pass the external messages received on this service, to a host. I am going to use a singleton pattern to avoid the race condition while receiving messages concurrently.

  1. Create a “Console Application” project named as “SelfHostService” using installed templates in Visual Studio
  2. Delete Program.cs file from project
  3. Add a new class named as SelfHostService.cs
  4. Click Add Reference menu to open a Add Reference Dialog Box
  5. Select System.ServiceProcess namespace to refer
  6. ServiceBase class resides in this newly added namespace, which is required to create a service application. Derive SerivceBase class in SelfHostService class
  7. Also add a reference to System.ServiceModel namespace
  8. Now let us put some code in SelfHostService class
  9.     public class SelfHostService : ServiceBase
        {
            public ServiceHost serviceHost = null;
            private bool startProcessing;        
            private static SelfHostService instance = null;
            private static readonly object padlock = new object();
    
            //a private constructor
            SelfHostService()
            {
                ServiceName = "Self Hosted Service";
            }
    
            //public static property to access the instance of the SelfHostService class
            public static SelfHostService Instance
            {
                get
                {
                    lock (padlock)
                    {
                        if (instance == null)
                            instance = new SelfHostService();
    
                        return instance;
                    }
                }
            }
        }
    
  10. In above code I have created a public property named Instance to provide a single instance of SelfHostService class
  11. Now let us define a service contract IMessageListener
  12. namespace SelfHostService
    {
        public interface IMessageListener
        {
            bool AcceptMessages(string messsage);
        }
    }
    
  13. We will have to override OnStart() and OnStop() methods of ServiceBase class. These methods contains instructions to follow when service starts and stops respectively. Let us write a code for these methods
  14.         protected override void OnStart(string[] args)
            {
                 if (serviceHost != null)
                        serviceHost.Close();
    
                    serviceHost = new ServiceHost(typeof(MessageListenerService));
    
                    serviceHost.Open();
    
                    var timer = new Timer();
                    timer.Interval = 60000;
                    timer.Elapsed += new ElapsedEventHandler(DoWork);
                    timer.Start();
            }
    
            protected override void OnStop()
            {
                if (serviceHost != null)
                {
                    serviceHost.Close();
                    serviceHost = null;
                }
            }
    
  15. DoWork method is a task assigned to a timer which has been initialized in OnStart() method. After every interval elapses, this method will get executed. So one can write any code which is to be performed repetitively by a window service.
  16.         private void DoWork(object sender, ElapsedEventArgs e)
            {
                //Add code to do the intended work
            }
    
  17. I will add a method to accept requests, received by MessageListenerService
  18.         public bool AcceptExternalMessages(string message)
            {
                if (string.IsNullOrEmpty(message))
                    return false;
                else
                    return true;
            }
    
  19. Now we will implement IMessageListener in MessageListenerService
  20.     public class MessageListenerService : IMessageListener
        {
            public bool AcceptMessages(string message)
            {
                //Notify message to windows service
                return SelfHostService.Instance.AcceptExternalMessages(message);
            }
        }
    
  21. We will have to configure the services’ base address, binding and contracts
  22. <?xml version="1.0" encoding="utf-8" ?>
    <configuration>
      <system.serviceModel>    
    	<services>
          <service name="SelfHostService.MessageListenerService" behaviorConfiguration="ServiceBehavior">
            <host>
              <baseAddresses>
                <add baseAddress="http://localhost:8082/SelfHostService/Service"/>
              </baseAddresses>
            </host>
            
            <endpoint address="" binding="wsHttpBinding" contract="SelfHostService.IMessageListener" />
            
            <endpoint address="mex" binding="mexHttpBinding" contract="IMetadataExchange" />
          </service>
        </services>
        <behaviors>
          <serviceBehaviors>
            <behavior name="ServiceBehavior" >
              <serviceMetadata httpGetEnabled="true"/>
              <serviceDebug includeExceptionDetailInFaults="false"/>
            </behavior>
          </serviceBehaviors>
        </behaviors>
      </system.serviceModel>
    </configuration>
    

In my next post I will write about how to install this service using InstallUtil.exe

Note: This code post is written in C# 6.0 in Visual Studio 2015